Summary: Combining website usability tests, user acceptance tests (UAT), and AB tests may sound like a ton of work. But having a website testing checklist to go through before launching a feature or pathway actually saves time and money in the long run.
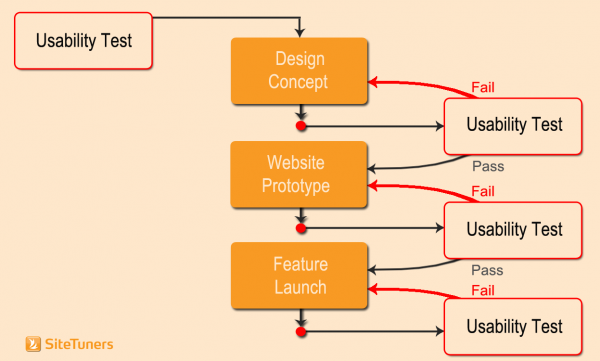
Let’s say your company needs to improve the product navigation experience. Your boss mentions that you’re going to develop new key ways to allow users to navigate – and you’re driving the project. To a lot of marketers, that process looks like this:
Technically speaking, that has all the components of a new feature you can launch on the site. However, using those as the core steps leaves the project success or failure to chance. Even assuming that development hiccups don’t happen, the new navigation path you’re building might be just as broken, or even worse than what you have now.
To avoid all that, you need tests. But which ones? And when do you apply all of those?
This is where a website testing checklist can help.
Let’s dive in.
1. Applying Usability Tests
Usability tests are, in essence, interviews with people who are trying to use something and should be included in your website testing checklist. You …
- … can (and should!) do this for competitor sites.
- … should be applying these to your design concepts as you build out new features.
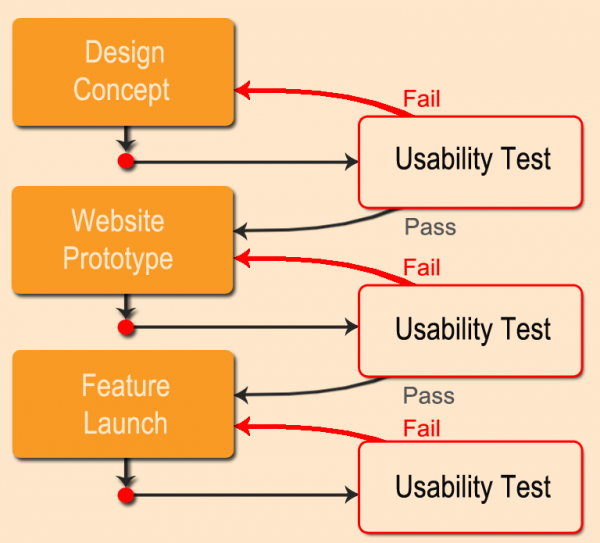
- … should test your prototypes as you build them out, and test them again when you launch the actual feature on your website.
Usability Tests on Competitor Sites
If you have competing sites that use a similar feature to the one that you want to build, you should ask a few people (don’t go too crazy on the number of people, 4-12 should do the trick) to conduct tasks on it, and have them talk through the process. That’s essentially it.
You’ll be able to get comments about why certain things work and why other things break expectations. All of that should feed into your design concept. From there, you need to test the design, the prototype, and the actual feature when it launches on the site.
Usability Tests on Internal Features
The principle is simple, even if in practice this sometimes gets complicated.
When you complete your design concept for the site, you should talk to 12 people. But not all at once.
- First, you get 4 people to try and perform a task using only your design concepts. After you talk to 4 people, you’ll catch the biggest issues on the designs.
- You’ll apply that to the designs, then talk to another 4 people. They’ll catch the biggest issues with the second version, and you can apply that to a third version of the concept.
- By the third version with your final set of 4 people, you should only have minor issues left … and you can proceed to the next stage.
And that’s basically the usability test. You’ll run that again when you have a prototype, and once more when the feature launches.
It does not take nearly as much time as it sounds, and it actually saves rather than cost most companies money. That’s because when you go from the design stage to the prototype stage, or from the prototype stage to the launch stage, it gets more expensive and time-consuming to change things.
This process ensures that what you’re building can actually be used to perform tasks efficiently, and you don’t have costly feature-revisions late in the project. You’ll catch the biggest user experience issues early.
‘Want to learn more about usability testing? We’ve got you covered. |
2. Applying User Acceptance Tests (UAT)
Of course, just because you’ve talked to people about the user experience doesn’t mean the actual feature will be bug-free. Your shiny new product navigation experience might be good in the usability testing phase for the design and prototype phases, but if it stops the shopping cart from working when you apply it to your site, you’ll hurt the business.
That’s where website user acceptance testing, or UAT, comes in.
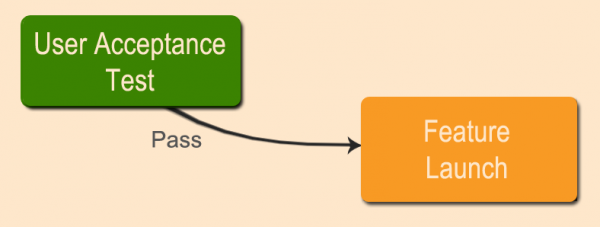
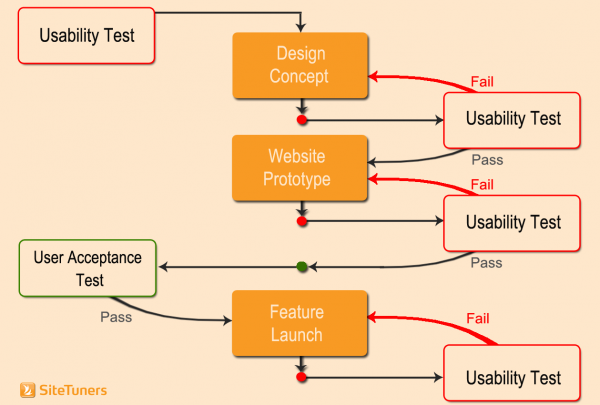
After the prototype passes usability testing but before the feature launches on the site, there should be a checklist of items for various internal resources of the company to check. This checklist should compromise part of your website testing checklist.
This is the closest thing to a “real world” test that you’ll have before you actually launch. UATs will cover more than the scenarios below, but you’ll at least need to understand if the …
- … planned feature performs according to specifications, and allows the user to do the intended task.
- … thing that you’re launching performs reasonably well, and falls within an agreed upon page load time threshold.
- … tweak you are planning for is compatible with other areas of the site, and doesn’t create problems in other parts of your website.
There should also be a driver – someone to remind people they still need to give their sign off that the feature works, and that it does not interfere with the site’s other functions.
Once you account for UAT, the entire process looks like this:
For some features, you could stop at that stage. But if what you’re building is designed to get significant traction for traffic and conversions, you need to add one more test.
3. Applying AB Tests / Split Tests
Once you’ve talked to enough users and ensured they can accomplish tasks, and after you’ve run tests to ensure that features work as planned without breaking anything, there’s still some work ahead: optimizing the pages for maximum impact.
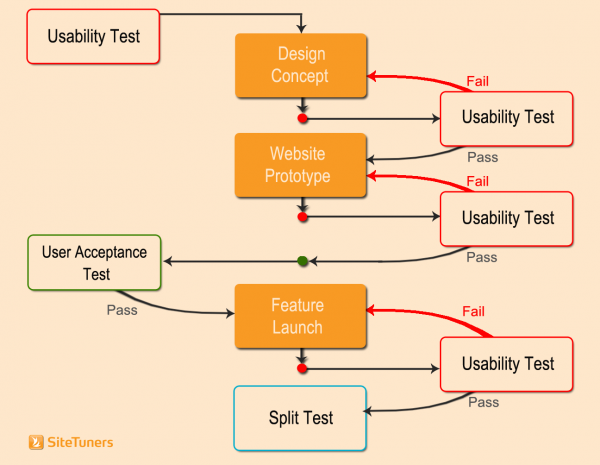
The AB tests or split tests come at the tail-end of the process, so your feature launch will now look something like this:
AB testing or split testing is something we’ve talk about in another blog post. If you need a detailed primer about the benefits, testing duration, things to avoid, and other nuances, you can read about split testing basics here.
But the general idea is, you’ll come up with two versions of the page, the one that you have just launched after the previous tests, and a challenger page, something that’s slightly different from what you launched – maybe you’ve slightly tweaked the calls-to-action, or you’re rewritten the titles of the product areas.
What split tests will do is divide the traffic between those two pages, and before long, you’ll have stats showing which page did better for you based on your chosen criteria.
Importance of a Website Testing Checklist
When you combine usability tests, user acceptance tests, and AB tests, what you generally have is a testing framework that leaves very little to chance.
It sounds like more work, but in practice, most of the work comes from redoing pages that do not work or features that break other things. Implementing the tests typically doesn’t result in lost time; for most of your larger projects, they’ll actually save time because you won’t be changing targets midstream, or making “panic changes” just before launch.
The three tests mean you’ll tackle minimal rework. They will ensure that users will be able to accomplish their tasks. And perhaps most importantly, they maximize your chances of converting visitors.
This post was originally published in August 2015 and has been updated for comprehensiveness.
