 Split-testing may be intimidating initially. But after your first three months of testing pages, you’ll look back at the time you weren’t testing and note how it all feels so … primitive.
It’s one of those tectonic marketing shifts, like the first time you’ve set up an analytics tool on your site to see what visitors do, or the first time you’ve set up a survey on your site to ask what visitors think.
You’ll grow as a marketer by leaps and bounds, not small steps.
That said, you do need to be comfortable with a few things to start testing.
- You need to be at least a little versed in web analytics tools, Google Analytics in this particular case
- You need to be able to edit enough HTML to insert a piece of script into the head tag, and to make a copy of an existing page
- Perhaps most importantly, you’ll need to have enough UX experience to know which ideas are worth testing
‘Got all that? Let’s get to it.
1. Find High Value Pages to Test
The first lie of testing is that you should test … everything. Nope, that’s not even close.
- Split testing only works for pages with significant traffic and conversions
- You need to be able to identify which pages can benefit most from testing
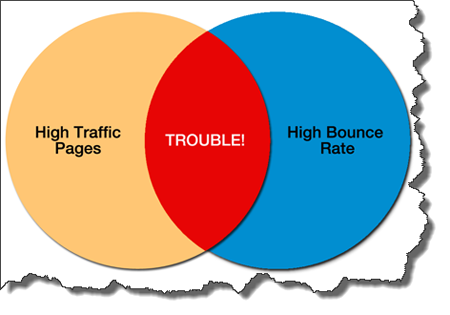
So your top candidates are the high-traffic pages where a ton of people leave without doing anything.
Thankfully, Google Analytics has a semi-hidden feature that surfaces those types of pages. Once you use that feature, you can review the top pages, and then theorize what you can do to improve them.
The moment you have a few ideas you can pull off via HTML, it’s time to set up a challenger page.
Learn how to find your high-traffic, high-bounce-rate pages through Weighted Sort.
Click here to read Using the Hidden Google Analytics Feature to Find Pages You Need to Fix
2. Set up a Challenger Page
The page you’re trying to improve is called the champion page. And the page you’d like to test to see if you can improve behavior is called the challenger page.
Challenger pages typically have a few things tweaked for improved conversions or reduced bounce rates. Usually, the elements you’ll change include one or more of the following elements:
- Headline – a challenger headline typically sticks close to the link or ad that drove the visitor there, but with slight word variations to test for the impact on conversions
- CTA size, color, location, and wording – the call-to-action is obviously fair game, and one of the most common things tested by optimization professionals
- Images – whether it’s testing “real photos” versus “stock photography” (usually to prove that stock photography doesn’t work to executives who think otherwise) or testing which images drive attention to the CTAs, image testing is fairly common in the field
- Scarcity indicators – if this is a relatively small tweak in your content management system, it usually pays to test expiration dates, stock items left, or other things that incentivize actions now rather than later
Once you have the URL of your champion and challenger pages, it’s time to start the content experiment.
3. Set up a Test in Google Analytics
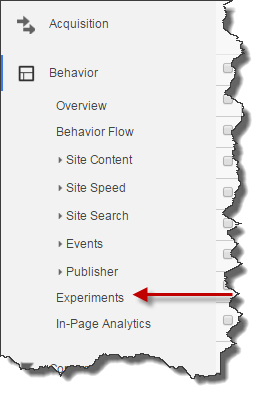
Go ahead and fire up Google Analytics. Under the left navigation, go to Behavior> Experiments.
Google Analytics will ask you which page you want to use – go ahead and insert the URL of the champion page, then start the experiment.
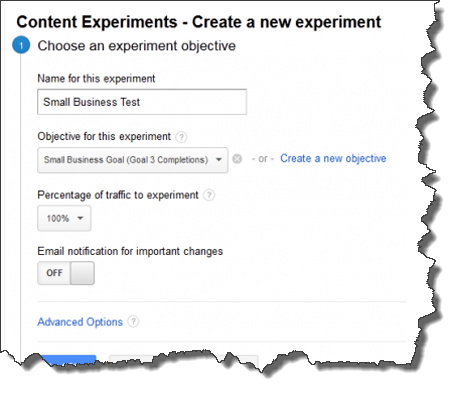
Then, GA will ask you to name the experiment, set the percentage of the traffic affected, and select a goal.
You should name the experiment something obvious or easy to recall down the line. You can set and you can choose the goal. (Usually for a content experiment, it’ll involve visiting a “thank you” page, or a bounce-rate related metric)
Your page should look like this, now:
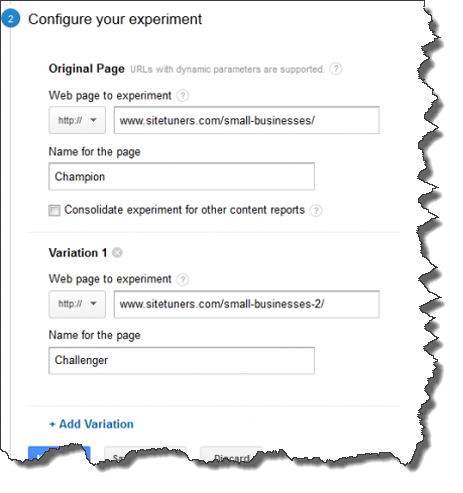
After you confirm and go to the next step, GA will ask for the URLs of the champion and challenger pages:
Once you’ve put in both URLs, you’re ready for the last step of the setup.
4. Add the Code to the Champion Page
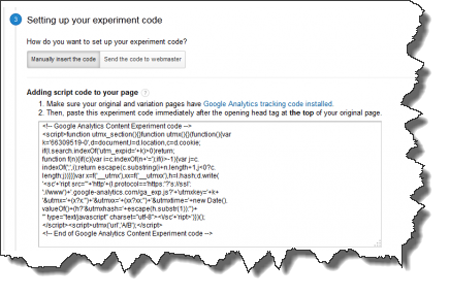
After you hit “Next,” Google will ask you to do one minor technical task: you need to add a piece of code to the <head> tag of the champion page.
Choose “Manually insert the code,” then add the script they provide you to your champion page:
Go to the champion page “back end.” Whether via HTML or Content Management System edits, add the script you copied from GA just below the <head> tag.
Then, go back to Google Analytics and click on “Next Step.” Review your experiment steps as required, then hit “Start Experiment.”
After that, you’re off to the races.
Putting It All Together
The conversion optimization toolset is actually a few different crafts combined.
If you use free tools rather than packages like Optimizely, you’ll need some familiarity with HTML and basic CSS. If you handle both the setup and the analysis, you’ll need to know Google Analytics fundamentals and basic familiarity with statistics. If you’re not relying on others for the potential improvements, you’ll need quite a bit of user experience knowledge to make the tests worth it.
If your talent stack has all of those covered, though, there’s no question that testing will help your site grow, and make you a better marketer in the process.
